You can use nested scheduled vectors to generate a simple, priority-based tracking schedule in STK. To generate a scheduled vector, define two vectors that switch on and off based on a schedule. For example, you can create a scheduled vector to point a satellite’s solar array deck toward the Sun when the satellite is sunlit and then point the solar array deck to zenith when not sunlit. You can expand this premise to do more than execute behavior A or B based on a schedule. By nesting scheduled vectors, you can define behavior B by another scheduled vector that executes either behavior C or behavior D.
Nesting scheduled vectors is useful for determining a simple, priority-based pointing schedule. The following example shows how to use nested scheduled vectors to create such a schedule for a notional mission.
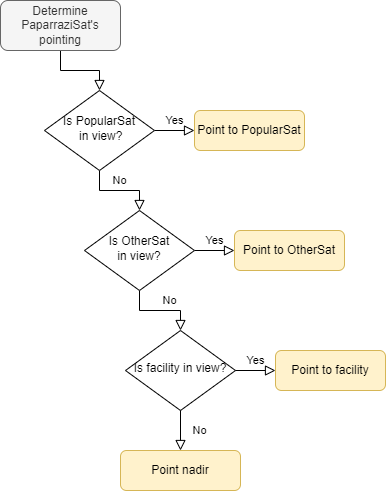
In the example below, a paparazzi satellite is responsible for imaging two satellites in similar orbits. When PaparazziSat has access to and can view both satellites, it must point to image the higher priority target, PopularSat. If it cannot image PopularSat, it should image OtherSat. If neither target satellite is accessible but the ground station is in view, PaparazziSat should point to the ground station to downlink its captured images. If no assets are available to PaparazziSat, it should point to nadir.
In this example, there is a known order prioritization that drives how PaparazziSat should point, as shown in the decision tree below:
Try creating this yourself by following these steps:
-
Start with a new scenario named NestedScheduledVectors. Create the scenario with the following start and stop times:
• Start Time: 28 Jun 2023 16:00:00.000 UTCG
• Stop Time: 28 Jun 2023 18:00:00.000 UTCG
-
Insert three satellites, using the Define Properties method, according to the table below:
|
Satellite Name
|
Semimajor axis
|
Eccentricity
|
Inclination
|
Argument of Perigee
|
RAAN
|
True Anomaly
|
|
PaparazziSat
|
12878 km
|
0
|
45 deg
|
0 deg
|
0 deg
|
90 deg
|
|
PopularSat
|
6878 km
|
0
|
30 deg
|
0 deg
|
25 deg
|
300 deg
|
|
OtherSat
|
7078 km
|
0
|
32 deg
|
0 deg
|
0 deg
|
345 deg
|
-
Add a sensor to PaparazziSat using the Define Properties method. Change the cone’s half angle to 2 degrees.
-
Insert a Facility using the Define Properties method:
• Name: Facility
• Latitude: 48 deg
• Longitude: 2 deg
-
Open the Access tool by right-clicking PaparazziSat and selecting Access.
-
Compute access from PaparazziSat to PopularSat, OtherSat, and Facility.
-
Observe the timeline view to see access intervals from PaparazziSat to the other objects in the scenario.

- Zoom to PaparazziSat and animate the scenario. You are going to set up this satellite so that:
• It will point at PopularSat when it’s available.
• It will point to OtherSat if PopularSat is unavailable.
• It will point to Facility when neither target satellite is available.
• It will point to nadir if no objects are available.
You will create scheduled vectors to do this.
-
Open STK's Analysis Workbench capability and click the Vector Geometry Tab. Select PaparazziSat on the left.
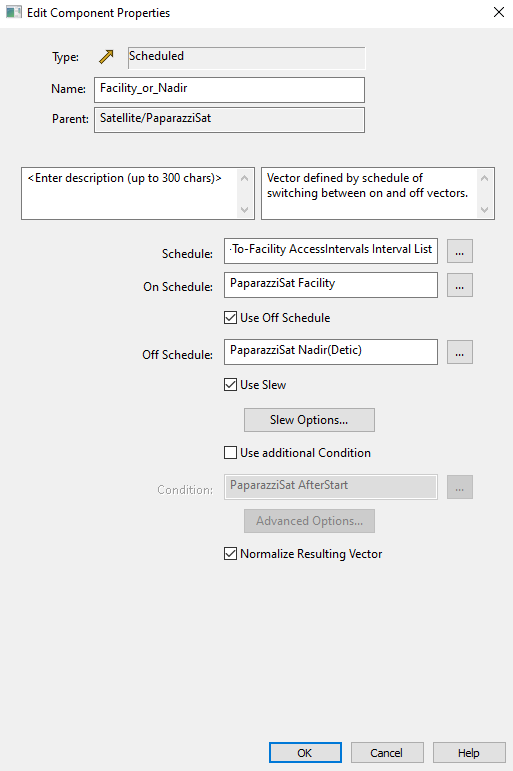
10. Create the lowest level (lowest priority) scheduled vector to point at the facility or point to nadir.
• Create a new vector of type Scheduled.
• Name the vector Facility_or_Nadir.
• Set the schedule to the AccessIntervals for the access between PaparazziSat and Facility.
• Set On Schedule to: PaparazziSat to Facility. You must select PaparazziSat on the left side of the window and expand the To Vectors on the right to select Facility.
• Set the Off Schedule to: PaparazziSat Nadir(Detic).
• Click OK to save the vector.
11. Create a scheduled vector for the next highest priority. This vector will point to OtherSat if it’s accessible and will point to the newly created Facility_or_Nadir vector otherwise.
• Create a new vector of type Scheduled.
• Name the vector OtherSat_or_Facility.
• Set the schedule to the AccessIntervals for the access between PaparazziSat and OtherSat.
• Set On Schedule to: PaparazziSat to OtherSat. You must select PaparazziSat on the left side of the window and expand the To Vectors on the right to select OtherSat.
• Set the Off Schedule to: PaparazziSat Facility_or_Nadir.
• Click OK to save the vector.
12. Create a scheduled vector for the highest priority target. This vector will point to PopularSat if it’s accessible and will point to the newly created OtherSat_or_Facility vector otherwise. This vector is a nested scheduled vector containing the priorities of targeting from all the scheduled vectors you have built.
• Create a new vector of type Scheduled.
• Name the vector PopularSat_or_OtherSat.
• Set the schedule to the AccessIntervals for the access between PaparazziSat and PopularSat.
• Set On Schedule to: PaparazziSat to PopularSat. You must select PaparazziSat on the left side of the window and expand the To Vectors on the right to select PopularSat.
• Set the Off Schedule to: PaparazziSat OtherSat_or_Facility.
• Click OK to save the vector.
13. Align PaparazziSat’s attitude to the scheduled vector, PopularSat_or_OtherSat.
• Open PaparazziSat’s properties and open the Basic/Attitude page.
• Change the Basic/Type to Aligned and Constrained.
• Set the Aligned Vector’s Reference vector to the PaparazziSat_or_OtherSat nested scheduled vector created in step 12.
• You can set the constrained vector’s reference vector to whatever you want; keep the constrained vector as the default vector. Think of this constrained vector as the ‘secondary goal’ of the aligned and constrained attitude profile. The primary goal is to always align with the Aligned Vector.
• Click OK to save the attitude profile and close PaparazziSat’s properties.
14. Reset the scenario animation time.
In this scenario, PaparazziSat first points to Facility until OtherSat is accessible. PaparazziSat then slews to point at OtherSat until PopularSat is accessible. It slews to track PopularSat until that access is lost. At that point in time, the only available behavior is nadir pointing, so PaparazziSat points to nadir.
You can expand this workflow to many more targets. To reduce the chance for user error, use scripting to automate the generation of nested scheduled vectors in Analysis Workbench, as described in the article Multitarget Satellite Pointing Using Nested Scheduled Vectors . For more complicated scheduling algorithms, AGI recommends using STK's Scheduler capability.
