Using the Ansys Systems Tool Kit® (STK®) application version 11.5 and later, you have the ability to enhance models with glTF textures that provide high-resolution graphics and reflective surface mapping. This article provides all of the necessary materials required to get started in this process. However, this is not meant to be a full-fledged tutorial on the subject. If you follow the steps below, you will be on your way to creating your own custom models with astounding graphics.
Setup
1. Download Blender here and Visual Studio Code (not Visual Studio) here. Install both applications on your computer and make sure they are working properly.
2. Download the attached file. Copy the add-ons folder within your download (...\glTF-Conversion-Materials\glTF-Blender-IO-master\addons) to your Blender add-ons file (C:\Program Files\Blender Foundation\Blender\#.##\scripts\addons).
If you have Blender version 2.8 or later, this feature will be built-in. In that case, move on to "Creating your Model" section.
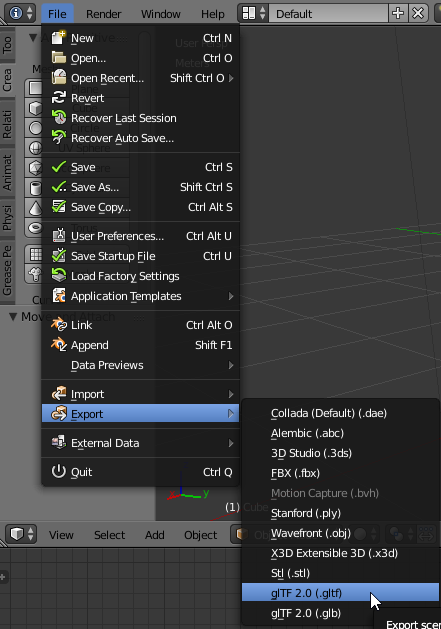
3. Open Blender and install the Blender glTF Exporter. To do this, you will need to go to File -> User Preferences and then go to the Add-ons tab.
4. In the search bar, look for glTF.

5. Choose the option for Import-Export: glTF 2.0 format.
6. Now when you choose File->Export (or Import), you will see the option for glTF 2.0.
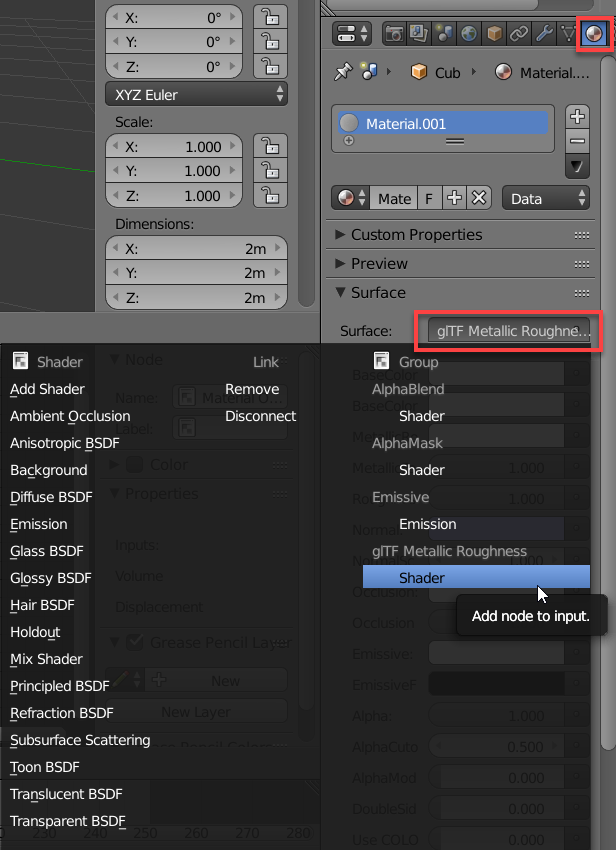
To get started in Blender, load in the default model, Default_GLTF_2.0_for_STK 11.5.blend, which came with the glTF Exporter download. When you open the file, you will notice shading controls located in the bottom middle of the screen, as shown below. These are the controls required to make very basic textures that reflect light.
When you have the default model loaded, you can load your models into the scene and you can delete the default cube at any time. You need to create a new material on each of your objects and assign the correct shader. You can do this by assigning the surface type, as shown below.
Adding articulations and exporting your model
1. Once your model is completed, you can export it as a glTF using the method shown in step 2.
2. Open VS Code and install the glTF Tools and STK GMDF Tools extensions. Locate these by simply searching the names in the extensions section as shown below.
3. Load glTF into VS Code by using the load option or dragging and dropping the file into the VS Code main window. If you import a GLB file, you need to create a glTF file by right-clicking the file name tab in VS Code and choosing “glTF: Import from GLB”.
4. To add articulations to your glTF model, you need to create a GMDF file. The documentation for writing articulations in these files is here, and you can create them inside VS Code. Some example GMDF files are in the samples folder.
5. Once you have defined all of your articulations, you need to inject the GMDF into glTF. Technically, the STK application can read a GMDF file for a model without injecting it into the glTF, but AGI recommends it in order to minimize the total number of files. For this to work properly, the GMDF filename must be the same as the glTF file and should be in the same directory. With the glTF file selected in VS Code, press Ctrl+Shift+P or F1 to search possible functions. Begin searching “inject” and select “Inject GMDF in glTF”. When you select this option, you notice that your GMDF data has been added to your glTF file.
6. Once you have injected the GMDF file, it is ready to be exported as a GLB file. To do this, right-click the filename tab and select Export to GLB. Then you can easily load the file into the STK application under the model properties for the object. The STK application also accepts the glTF format, but AGI recommends exporting it as a GLB.

