The
Loading Terrain Data tutorial in STK Help uses the Utilities >
Imagery and Terrain Converter to generate an STK terrain file (*.pdtt) that matches the extent of the input image (.jp2 or .pdttx).
This tutorial uses the Utilities >
Imagery and Terrain Converter to generate an STK terrain file (*.pdtt) with the same extent or optionally a subset of the input source.
Load the terrain into the scenario
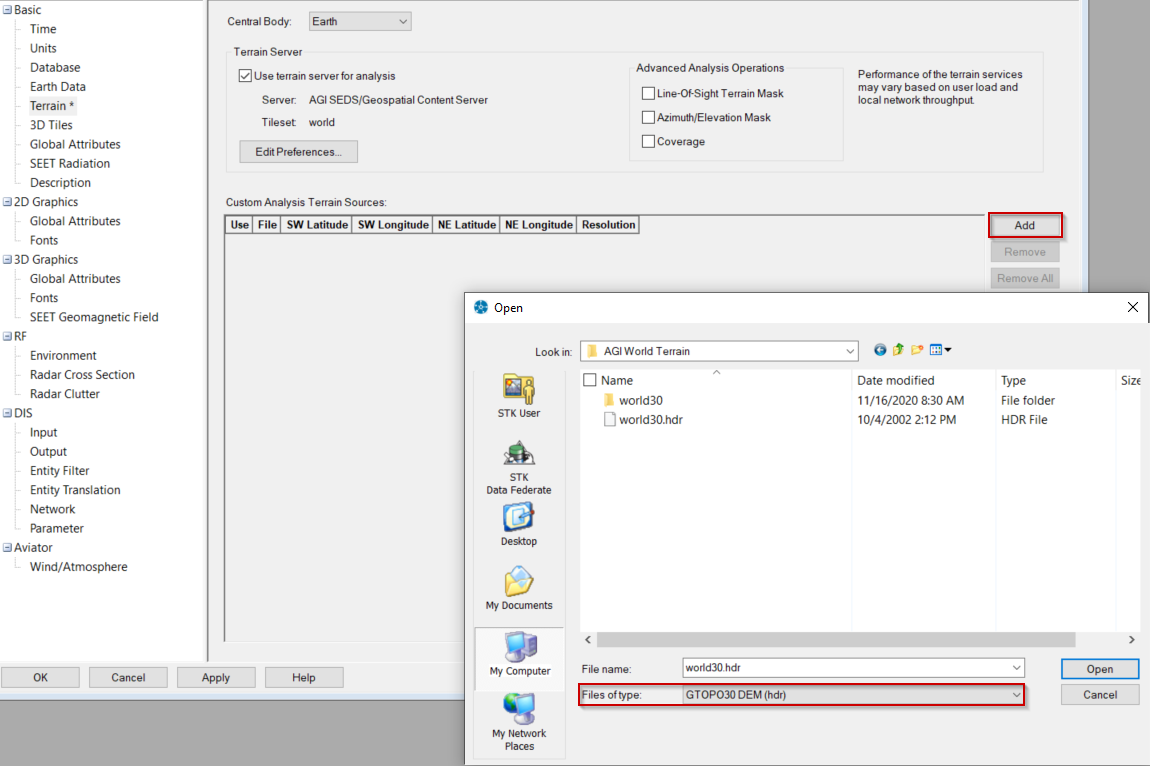
- Open the scenario's Properties Browser.
- Select the Basic - Terrain page.
- Click the Add button.
- Select your format in the “Files of Type” drop-down menu.
- Find and Select your Terrain File.
- Click OK twice to accept and close the Scenario Properties Browser.
In this example, you chose the AGI World Terrain HDR header file that is available on the STK data disc. To use the terrain file you've chosen, select Add and browse to the file. Ensure that the "Files of type" field matches your file type. By default, the AGI World Terrain data set installs to C:\Program Files (x86)\AGI\PlanetaryData\Earth\AGI World Terrain.
View the terrain extents in 2D Graphics window
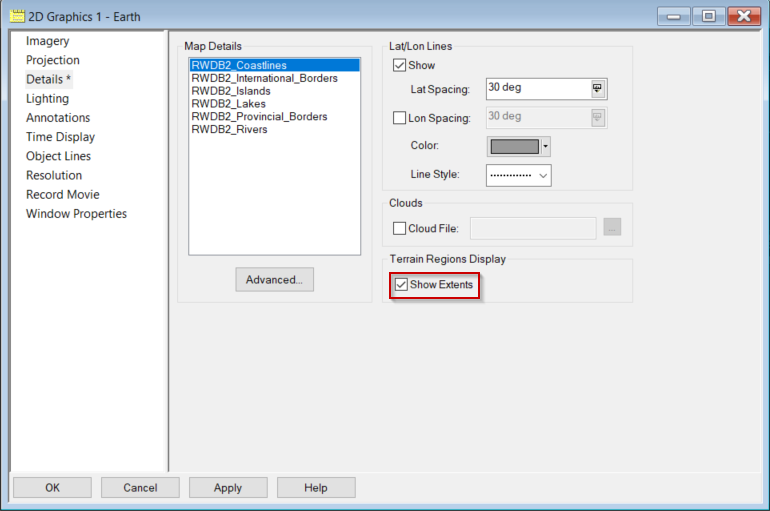
- Open the 2D Graphics window properties.
- Select the Details page.
- Select the Terrain Extents option.
- In the 2D Graphics window, use the zoom controls to orient the view on the yellow rectangle in your terrain location. If the terrain source is the global extents, you will see a yellow outline on the edge of the 2D Graphics window when zoomed out completely.
Process your terrain for visualization
- Open the Utilities menu.
- Select the Imagery and Terrain Converter.
- Select the Terrain Region page on the left.
- Here you choose which scenario terrain source to convert into STK Terrain (.pdtt). You can either convert the entire source or specify a custom subset extent.
- For the entire source, simply select it from Terrain Source drop-down menu and click Convert.
Important: AGI World Terrain is global and can take several hours to process. It will produce an STK Terrain file (.pdtt) that is several gigabytes in size.
Subset of Terrain Source
For a subset of Terrain Source extent, complete the following steps. Once complete, you can drag and drop the output *.pdtt file onto the 3D Graphics window or load it via the Globe Manager. In the Globe Manager, you can use Zoom To or Toggle Extents from the right-click shortcut menu.
- Select your source from the Terrain Source drop-down menu.
- Check Custom Region.
- Switch to the 2D Graphics window and drag to draw a box by holding down the left mouse button while pointing within the yellow polygon representing the terrain extents.
- Switch back to the Imagery and Terrain Converter and notice the Custom Extent fields updated by the box you created.
- Optional: Type your coordinates instead of using the previous two steps.
- Click Convert.
Two or more Terrain Sources
For a subset of two or more Terrain Source extents, complete these steps.
Example 1: You have two Terrain Sources and you want an area that is on the edge.
- Leave the Terrain Source set to Automatic Selection.
- The "Custom Extents" fields are editable.
- Complete steps 1 through 6 from the Subset of Terrain Source section above.
*********************************************************************
Additional notes about specific STK Terrain Source file types
*********************************************************************
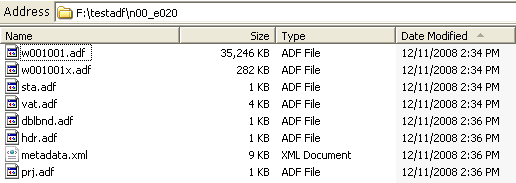
ESRI GRID format
The ADF or GRID is a raster format created by ESRI software that can contain imagery or terrain. If this file contains terrain data, you can use it as an
STK Terrain Source. The steps below
assume land-based terrain with rectangular extents and elevations that are based on the WGS84 ellipsoid.
Below is a sample GRID / ADF Directory. You must keep all files together, and you must load the one with the largest file size in STK.
NGA DTED (.DT1, .DT2, etc) vs NGA DMED file: Which should I use as Scenario Terrain source?
A typical NGA *dted disc will have a *dmed header that references subdirectories named by longitude containing files that are named by latitude. It is ideal to load the *dmed as the STK Terrain Source and let STK recursively load all of the children (*.dt) files.
After doing this, use the steps "For a subset of two or more Terrain Source extents" above to provide coordinates that span the entire extent of the *dted data set. This creates one STK Terrain File (*.pdtt). If no *dmed file is available, then you have no option but to load the individual *.dt files.

